
Table of Contents
- Why these migrations usually fail
- What you need before you start
- Activation and licensing
- Creating the job
- Connecting the source Exchange Server
- Connecting Microsoft 365
- Detecting Target Mailboxes
- Mapping Source and Target Mailboxes
- Configuring Migration Settings
- Reviewing the Job Summary
- Starting the Job
- Running the migration and how re-runs work
- Incremental Migration Retry
- Observed migration status
- The migration report
- Pros and cons
- Who this is for
- Bottom line
A real test, real numbers, and a close look at how re-runs and reporting work in practice.
Most Exchange to Microsoft 365 migration guides are written by people who never ran the tool. This one is different. I installed Stellar Migrator for Exchange, connected a real Exchange Server to a real Microsoft 365 tenant, and migrated a mailbox into a completely different target address. I then watched a second pass pick up the items the first pass had missed, without rebuilding the job, and opened the destination mailbox to confirm the emails arrived.
Below is everything you need before you start, the full walkthrough, how re-runs work, what the second pass recovered, and what the migration report actually confirms.
Privacy note: Account email addresses, administrative sign-in details, application identifiers and client secrets are concealed in the accompanying screenshots. To match those redactions, this review uses “Source Mailbox A” and “Target Mailbox B” instead of identifying account names or addresses.
Why these migrations usually fail
Before the walkthrough, a quick reality check. The three most common ways these migrations go wrong have nothing to do with the tool:
1. The admin account lacks impersonation rights, so the connection validates but mailboxes never load.
2. Mailboxes get mapped to the wrong target because the tool matched addresses automatically and nobody double checked.
3. Nobody can prove what moved. The migration "finishes," but there is no record of totals, failures or skipped items.
I tested Stellar Migrator for Exchange specifically against these three problems. Keep them in mind as you read.
What you need before you start
Five minutes of preparation here saves an hour of troubleshooting later.
System requirements (from Stellar's documentation)
| Component | Requirement |
| Processor | Intel-compatible, x64 |
| Operating system | Windows 11, 10, 8.1, 8 or Windows Server 2022, 2019, 2016, 2012 (x64 only) |
| Memory | 8 GB minimum, 16 GB recommended |
| Disk space | 250 MB free |
Supported migration paths
● Exchange Server to Microsoft 365 (the one covered here)
● Exchange Server to Exchange Server
● Microsoft 365 to Exchange Server
● Microsoft 365 to Microsoft 365
The tool handles primary, shared and archive mailboxes plus public folders, and Stellar's documentation confirms it never deletes or modifies anything on the source server. Your original data stays exactly where it was.
On the Exchange side
● An account with impersonation rights. Stellar's documentation calls this mandatory, and the tool repeats it on screen. Set it up before you launch.
● Autodiscover working, or the server IP or FQDN if you prefer to connect directly.
On the Microsoft 365 side
● Either a Global admin account (for auto registration), or
● An Azure AD app registration with the Application (client) ID, Directory (tenant) ID and a Client Secret (for manual registration).
● Target mailboxes already set up in Microsoft 365. The tool migrates data into existing mailboxes; it does not create users.
Licensing
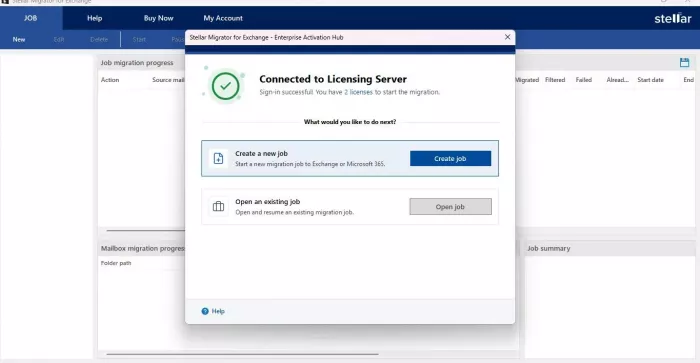
Licenses are counted per source mailbox, and each primary mailbox and each archive mailbox uses one license. My test account came with two free mailbox licenses, which is enough to migrate a real mailbox and judge the tool before you spend anything.
Activation and licensing
After installing, the tool opens the Enterprise Activation Hub. You sign in with the credentials Stellar sends to your email, and the licensing server confirms your mailbox count instantly.
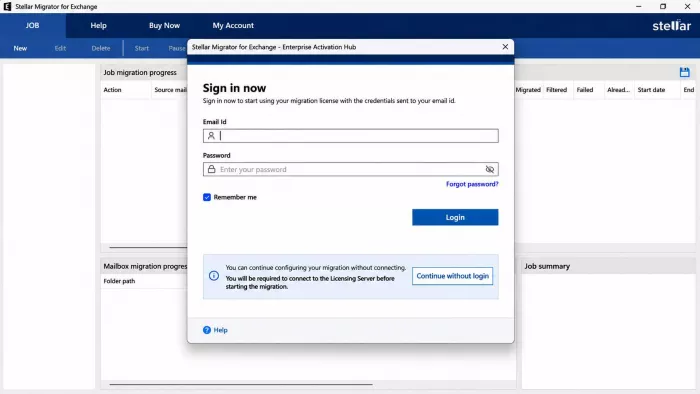
A small but smart detail: you can click Continue without login and build the entire job offline. The tool only asks you to connect to the licensing server at the moment you press Start, so you can configure everything in advance and activate when you are ready.
Creating the job
The wizard runs down the left side as a checklist, so you always know how many steps remain. I named the job Exchange_to_M365_Test and kept the mailbox type at primary and shared mailboxes. Archive mailboxes and public folders are one checkbox away if you need them.
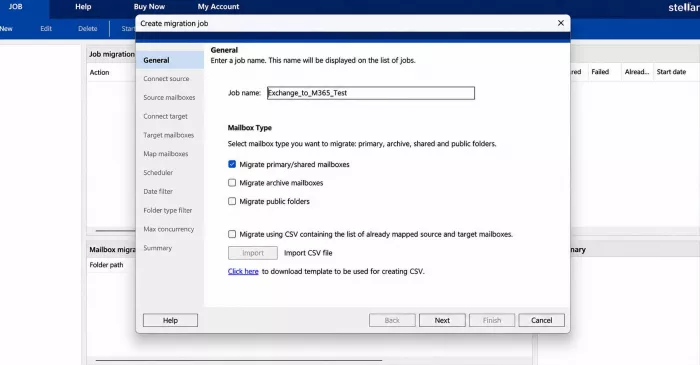
Worth knowing: there is a CSV import on this screen for pre-mapped source and target pairs. If you are migrating hundreds of mailboxes, this is the path you will use, and the template is downloadable right there.
Connecting the source Exchange Server
I used Autodiscover, entered the source administrator account details and let the tool validate the connection.
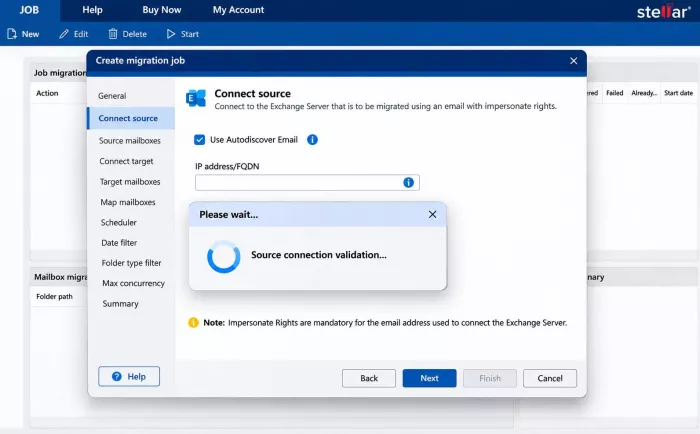
Here is the thing that catches people. The note at the bottom of this screen says impersonation rights are mandatory for the connecting account. This is not a suggestion. Without impersonation, the connection may succeed but the mailbox list will be empty or incomplete.
Connecting Microsoft 365
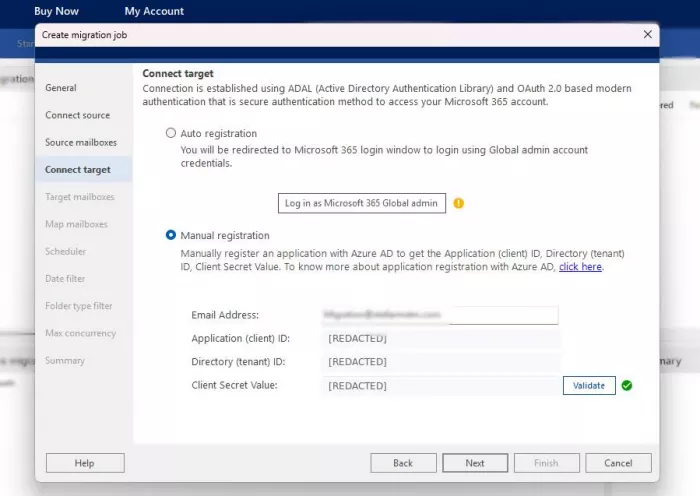
The target connection uses OAuth 2.0 modern authentication, which is the only method Microsoft still recommends. You get two routes:
● Auto registration: log in as a Global admin and the tool handles the app registration.
● Manual registration: Manual registration: enter the Application (client) ID, Directory (tenant) ID and Client Secret from Azure AD. These values are hidden in the screenshots for security.
I chose manual registration to keep control of the application configuration. I entered the required values, selected Validate and confirmed that the connection succeeded. None of the authentication values are shown in this review.
Detecting Target Mailboxes
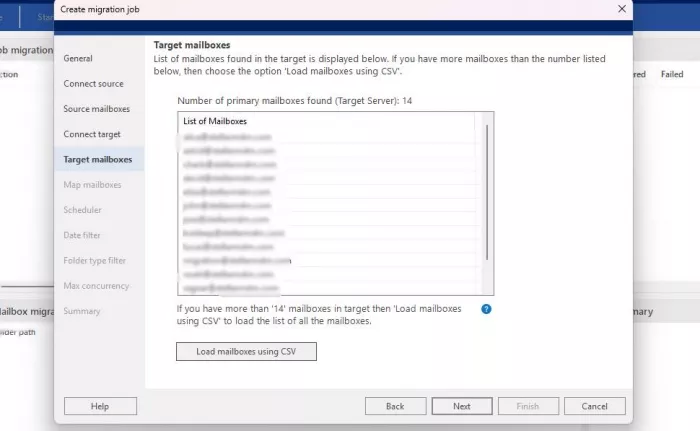
Once the Microsoft 365 connection was validated, Stellar displayed a list of available destination mailboxes.
In my test, the application detected 14 primary mailboxes in the target environment. The intended destination mailbox (Target Mailbox B) was already available, so there was no need to import an additional CSV file.
Mapping Source and Target Mailboxes
The mailbox mapping stage was one of the most important parts of the test. Stellar offers automatic mapping based on matching email addresses, which saves time when source and target addresses line up.
My assignment was different. I needed to move Source Mailbox A from Exchange into a different, already-existing destination, Target Mailbox B, in Microsoft 365. A similar mapping may be needed when consolidating a departing employee’s mail into a manager’s mailbox or moving content into a renamed account.
Initially, Source Mailbox A was automatically paired with a same-named Microsoft 365 mailbox. I disabled automatic mapping, removed the unwanted pairings, and manually selected the different destination, Target Mailbox B.
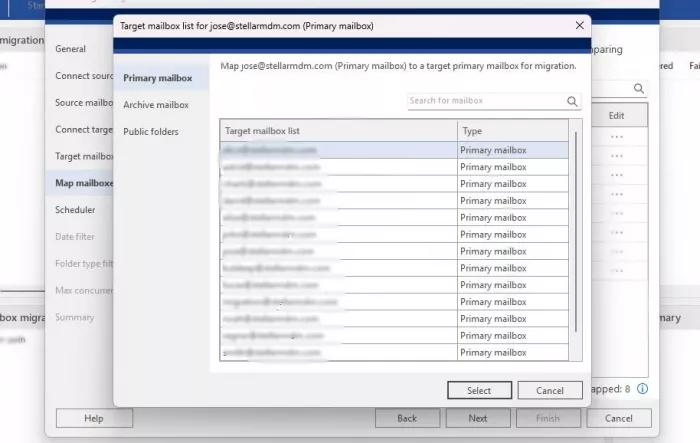
After the change, the mapping screen showed only one active mailbox mapping:
Source Mailbox A → Target Mailbox B
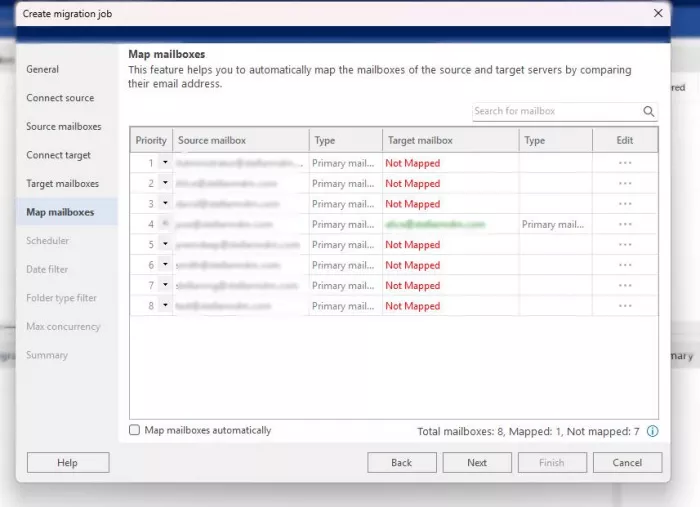
This was also the stage where I noticed that revisiting the Microsoft 365 connection could cause automatic mappings to reappear. Checking the final mapping immediately before creating the job was therefore essential.
Why I switched to manual - I needed to move Source Mailbox A from Exchange into a different, already-existing destination, Target Mailbox B, in Microsoft 365. A similar mapping may be needed when consolidating a departing employee’s mail into a manager’s mailbox or moving content into a renamed account.
I unchecked automatic mapping, which cleared the auto-matched pairs, then manually mapped Source Mailbox A to Target Mailbox B.
Configuring Migration Settings
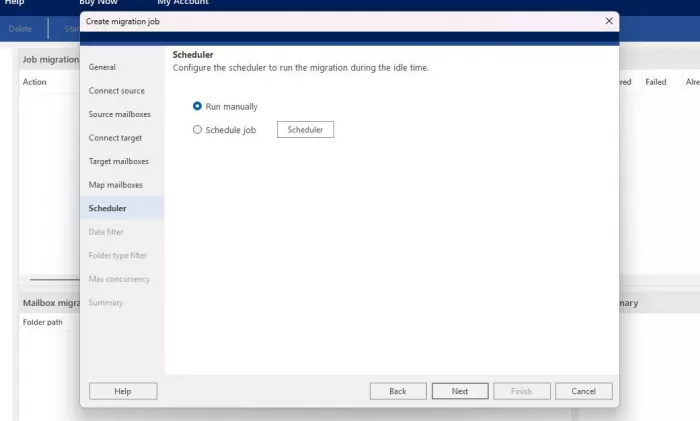
After mapping the mailboxes, I configured the migration schedule. The software offered two options: run manually or schedule the job for a selected time.
I chose Run manually because I wanted to start the test only after confirming the configuration.
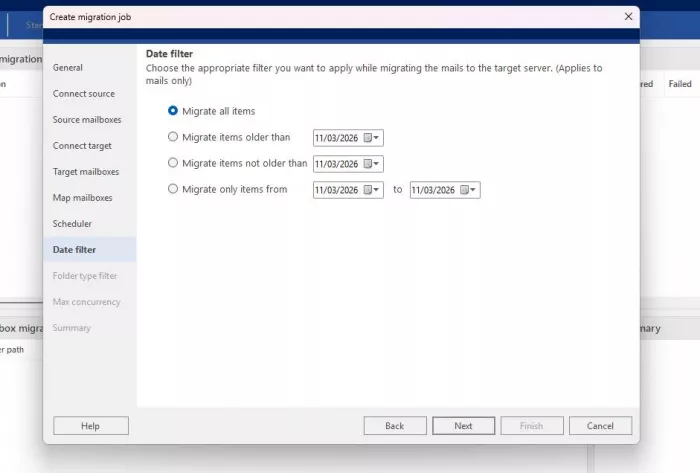
The next setting controlled the date range of the emails being migrated. I selected Migrate all items so that messages would not be excluded based on their dates.
I also retained the setting to migrate all supported folder types. Archive mailboxes and public folders were outside the scope of this particular test.
Reviewing the Job Summary
Before creating the job, I inspected the summary screen. It displayed the job name, server types, connection identities, mapped mailbox count, filters, and concurrency settings.
The job was named Exchange_to_M365_Test, with one primary mailbox mapped.
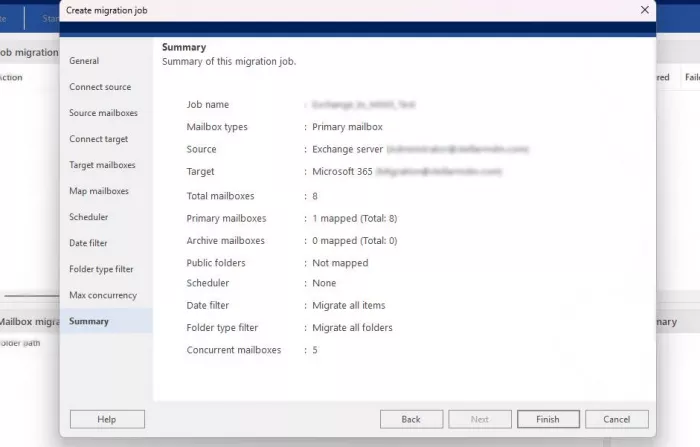
The summary showed eight detected source mailboxes but only one mapped mailbox. This was expected because the test covered only Source Mailbox A.
The concurrency value remained at five, but that did not change the number of mailboxes selected for migration.
Starting the Job
After confirming the settings, I clicked Finish to create the migration job.
The software returned to its main dashboard and displayed the source mailbox, destination mailbox, and migration status. At this point, the job had been created but no data transfer had started.
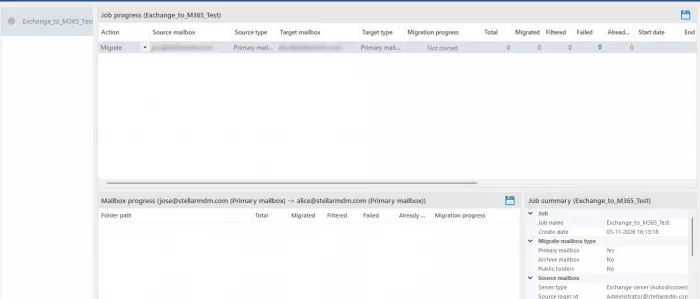
I started the job manually from the toolbar. The overall status changed to Running, although the individual mailbox row initially remained at Not started.
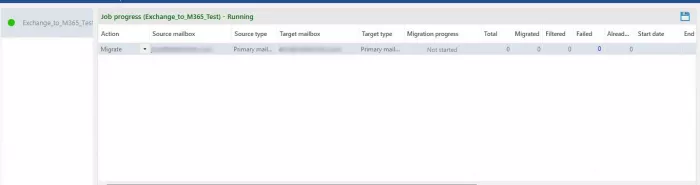
This distinction matters when monitoring a migration. The overall job can be active before the application starts recording transferred mailbox items.
| Detail | Result |
| Source | Source Mailbox A |
| Destination | Target Mailbox B |
Two lines. If they are wrong, nothing else matters. Mine were right, so I started the job manually from the toolbar. .
The overall status changed to Running, while the individual mailbox row initially showed Not started. This is useful to know when monitoring a migration: the job becomes active first, and the mailbox counters begin updating once items start transferring.
Running the migration and how re-runs work
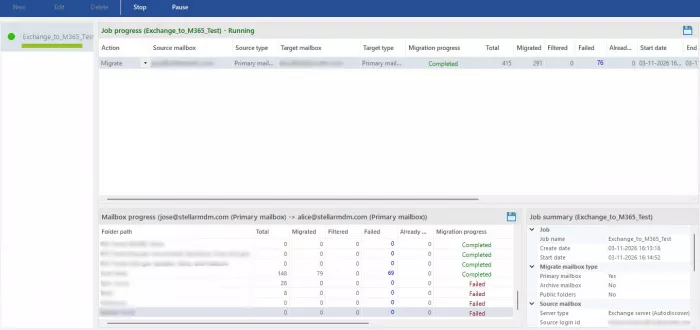
The job flipped to Running and worked through the mailbox folder by folder. The progress panel shows total, migrated, filtered, failed and already migrated counts for every folder, so you can see exactly what is happening instead of staring at a spinning icon. There is also a Pause button in the ribbon, and Stellar's FAQ confirms you can pause and resume without losing data, which is handy if the network drops or you need to hold the migration until off-hours.
Incremental Migration Retry
After the first pass, the same job began another migration pass without requiring me to create a separate job.
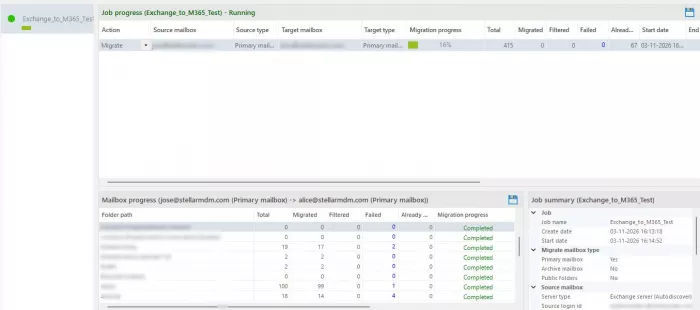
The application recognized previously migrated items through its Already migrated counter and concentrated on what was left. The second pass reported 117 newly migrated items, 291 already migrated, and seven failed, taking the failure count from 76 down to seven.
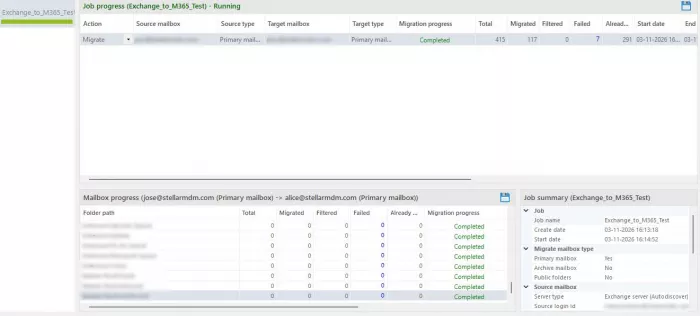
This was one of the most useful observations from the test. A re-run of the same job recovered the large majority of the items that had not been transferred the first time.
Why re-running is safe
The Already Migrated column is the quiet hero here. Stellar's FAQ says the tool supports incremental migration by default, which means it checks the target for items that are already there and skips them instead of copying them again. Stellar's knowledge base goes further and states that no duplicate data will be transferred. In my run, 291 items were counted as already migrated and left alone. That means you can:
● Re-run the job after a failure and only the missing items get copied
● Re-run after new mail arrives at the source and only the new items get copied
● Do one last sync right before cutover without creating a single duplicate
For a real production migration, this is the property that matters most. A tool that cannot re-run safely forces you into one high-stakes window. This one lets you run the job as many times as you need, and every pass only touches what is missing.
Observed migration status
After the second pass, 408 of 415 items (98.3 percent) were accounted for in the target mailbox, either newly migrated or recognized as already there.
The first-pass dashboard gives folder-level detail, which makes it easy to see where a re-run is needed. A few of the flagged folders were system folders such as Sync Issues and Yammer Root, which hold synchronization and legacy app data rather than user mail. The user folders to watch were Sent Items, with 69 items flagged on the first pass, and Tasks.
Seven items remained in the failed column at the end. Some of these were in system folders of the same kind. It is common for such folders not to transfer in an Exchange migration, and a user does not need them in the new mailbox, so they do not affect day-to-day use.
With 408 of 415 items in place after two passes, I count this test as a success.
A reading tip for the dashboard: Completed means the tool has finished processing a pass. The counters beside it tells you how many items moved, so a quick look at them is the natural last step before sign-off.
The migration report
Every migration tool shows a progress bar. Very few give you a document you can hand to a client, a manager or an auditor. This one does, and it is the feature that pushed my opinion from "fine" to "I would use this."
One click on the save icon exports the report as a browser-viewable HTML file, and it can also be saved in Word format. Stellar's help pages describe both a Job Progress report and a Mailbox Progress report, so you can go as granular as a single folder.
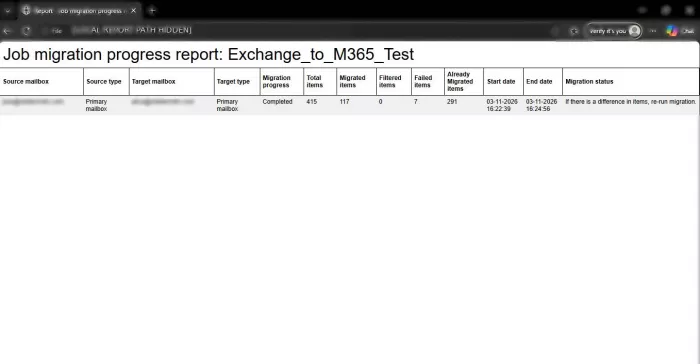
Here is what mine contained, and what each number means:
| Field | My result | What it tells you |
| Migration progress | Completed | The job finished end to end |
| Total items | 415 | Everything the tool found in scope |
| Migrated items | 117 | Copied fresh in this run |
| Already migrated | 291 | Found in the target and skipped, no duplicates |
| Items in target mailbox | 408 of 415 (98.3%) | Migrated plus already migrated |
| Time taken | 2 minutes 17 seconds | 16:22:39 to 16:24:56 pass |
The headline number is 408 of 415. That is 117 items copied fresh plus 291 already in place, or 98.3 percent of the mailbox after two passes. The report also lists the remaining seven items, which include system-folder items that users do not need, so the full 415 is accounted for.
Why this matters more than any other feature: when a user says “my calendar invites from 2024 are missing,” you do not want to be guessing. You want a timestamped document showing what moved, what was skipped and what failed, per mailbox. This report is that document.
Pros and cons
What stood out
● Build the job offline, activate only when you press Start
● Manual mapping lets you migrate into a differently named mailbox without workarounds
● Re-run a job and only the failed or remaining items are retried, with no full restart
● Incremental migration is on by default, so re-runs skip what is already in the target instead of duplicating it
● Pause and resume without data loss, confirmed in Stellar's FAQ
● The exportable report accounts for every single item
● Nothing is deleted or modified on the source server
Good to know before you start
● Impersonation rights on the source account are required, so set them up first
● Automatic mapping pairs mailboxes for you, so review the pairs before you press Start
● Target mailboxes need to exist in Microsoft 365 before mapping; the tool migrates data rather than creating users
● A few system-folder items may show as failed. This is common in Exchange migrations and does not affect user mail
Who this is for
Small and mid-sized IT teams, MSPs handling client cutovers, and anyone who has been burned by a migration they could not document afterward. If you are moving a few mailboxes, the free licenses let you run a real test before spending anything. If you are moving hundreds, the CSV mapping and concurrency controls are built for it.
Bottom line
Stellar Migrator for Exchange successfully carried out the configured Exchange Server to Microsoft 365 migration test in my lab environment. This Exchange Migration tool graphical interface made it possible to configure source and destination connections, manually map mailboxes, control migration settings, and monitor item-level progress without writing migration scripts.
The most useful feature during testing was incremental migration. After the first pass reported 76 failures, a second pass recorded 117 newly migrated items and recognized 291 previously migrated items, bringing the mailbox to 408 of 415 items. The seven that remained included system-folder items that users do not need.
The progress counters and exportable HTML report made the outcome easy to read and easy to document. I opened the destination mailbox in Outlook and confirmed the migrated mail was there. A full item-by-item comparison against the source was not part of this test.
Based on this test, the migration was a success, and Stellar Migrator for Exchange is a strong option for organizations that need a controlled, well-documented Exchange and Microsoft 365 mailbox migration.


Comments